Senin, 30 Juli 2012

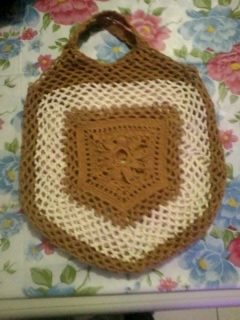
Crocheted Pentagon Bag


Hi, back again!! This is my Crocheted Pentagon Bag that given to celebrate my friend's graduation. I got this bag's pattern from my friend's Japanese Crochet Book. Honestly, I am so hesitate to show you the pattern, because the pattern is not mine. Really sorry.. I just share the photos..

Really happy to see my friend's smile when she got my gift.. :-) I wish she like it!!


Minggu, 29 Juli 2012

Lulu Graduation Bear


Last June is my friend's big day. She graduated from International High School and she wanted to continue her education abroad. I want to give her a little gift to express my happiness with her graduation. I made for her a Little Crocheted Pentagon Bag with Amigurumi Graduation Bear Key-chain. For Amigurumi Graduation Bear, you can make it too by follow the instruction here :


http://www.greatamigurumi.blogspot.com/2010/04/graduation-bear.html


Looks different? Haha... :-D May be my version has two big eyes, a big nose too... and the bear is wearing a graduation shawl. A little modification and different material can make it different.  Additional, here is the graduation's shawl pattern : 
with blue yarn :
R1 : ch 40 turn
R2 : ch1, sc1 in second st from hook, ch in next st (40) turn
with yellow yarn :
R3-4 : ch 1, st in next st (40) turn
with blue yarn :
R5 : ch1, st ini nect st (40) fasten off
tie some little yarn on two little side of shawl for tuft


Lulu Amigurumi Graduation Bear
I will share my story for Crocheted Pentagon Bag in my next post.
Keep creating to give your friend something special.. :-)

Jumat, 27 Juli 2012

Strawberries in The Basket


Have you ever seen Rabbits eat strawberries? You can find it in this blog!! Haha :-D :-D
Yeah, I made a basket full of chocolate strawberries to accompany Leo's Family. Why did I choose strawberries, not carrot? The answer is just simple, I love strawberries :-D

Chocolate Strawberries Amigurumi


Here is the Chocolate Strawberries Pattern :
with brown yarn :
R1 : sc 6 in magic ring (6)
R2 : 1 sc all arround (6)
R3 : sc 2 in each st (12)
R4-5 : 1 sc all arround (12)
R6 : *1 sc, sc 2 in next st* repeat (18)
R7 : 1 sc all arround (18)
with red yarn :
R8 : *2 sc, sc 2 in next st* repeat (24)
R9 : 1 sc all arround (24)
R10 : *2 sc, sc2tog in next st* repeat (18)
R11 : 1 sc all arround (18)
R12 : *1 sc, sc2tog in next st* repeat (12)
R13 : sc2tog all arround (6)
Fasten off

Strawberry's leaves with green yarn :
R1 : sc 6 in magic ring (6)
R2 : sc 2 in each st arround (12)
R3 : in the same st, sc1, ch4
       skip 1 st
       in the next st, sc3
       in the next st, sc1
       repeat
Fasten off

Strawberry's stalk :
R1 : ch 6
R2 : sl st 1 in each ch
Fasten off
Sew three parts together


Strawberries basket pattern : 
I followed the instruction of basket making from this this link below : 
http://www.greatamigurumi.blogspot.com/2010/04/potted-plant-with-flowers.html


Leo's Family is ready to go Camping :-D

3 color Crocheted Bell Ball


Today I will share to you about Leo's ball, 3 Color Crocheted Bell Ball. I made it from unused plastic ball and my old yard from my storage. The material  that I bought just 1 golden bell at the Craft Shop. 

First, I cut the plastic ball with scissor to make a little hollow to put the golden bell in. You can hear that the bell is ringing when you shake the ball!! :-D Then, I started to wrap up it with crocheted yarn.
Here is the pattern :
with blue yarn :
R1 : ch 2
R2 : sc 8 (8)
R3 : *1 sc, sc 2 in next st* repeat (12)
R4 : *1 sc, sc 2 in next st* repeat (18)
R5 : *2 sc, sc 2 in next st* repeat (24)
R6 : *2 sc, sc 2 in next st* repeat (32)
R7 : *3 sc, sc 2 in next st* repeat (40)
with red yarn : 
R8-10 = R7 (40)
finish, leaving a long tail for sewing
make it twice, with blue and green yarn.
put the plastic ball into two bowl of crochet ball. sew it together.
This is a cute baby's toy

Crocheted Bell Ball
Pleasure if you can share your version!!

Kamis, 26 Juli 2012

The Leo's Amigurumi Rabbit Family


Keep Creating!!

I still be eager to make more rabbits. I think Jack and Adele are cute enough, but I am sure I can make the cuter one than before. I want to make Rabbit Family for my friend's son as 1st birthday present. He is sooo cute baby, often make me smile with his laugh :-) I think he is a cutest boy in the world!! :-D

I started to make a little one. So sad, I forgot to take a process picture :-( I named him Little Lui. Wearing a yellow jacket, he looks like baby rabbit.. :-) 

Lui Amigurumi Baby Rabbit

May be, you will ask me about the yellow jacket pattern. The pattern is absolutely similar with the basic rabbit pattern before, I just make half of the basic pattern, then joined both together. Btw, I think the dog's and cat's nose material that I used at Lui's are too big, but I didn't get smaller one at the craft shop.. so.. it's oke.. it's cute enough..

Then, I made Lui's father and Mother with thicker yarn to get a bigger rabbit. I named them Daddy Leo and Mommy Celly. 


Leo's Amigurumi Rabbit Family

I will share with you about Leo's and Celly's costume :-) This is my trial and error experiment.


Leo's hat :

R1 : ch2

R2 : sc6 in the second st from hook (6)
R3 : sc 2 in each st (12)
R4 : *1sc, sc2 in the next st* repeat 6 times (18)
R5 : *2sc, sc2 in the next st* repeat 6 times (24)
R6 : 1 sc (24)
R7 : *1sc, sc2tog in the next st* repeat 6 times (18)
R8 : make a cap : 6 dc in 3rd from hook, joint it with slst in next 3st.
R9 : *2 sc, sc1* repeat along the half circle.


Leo's vest : 
R1 : ch 26
R2 : 6 dc in each st , ch 1 (skip st), 12 dc in each st, ch 1 (skip st), 6 dc in each st. 
the skip is for Leo's arm across the vest in.
Btw, Leo's shirt is a half basic pattern.


Stay in the Box

Celly's hat :
with pink yarn
R1 : ch 2
R2 : sc6 in the second st from hook (6)
R3 : sc 2 in each st (12)
R4 : *1sc, sc2 in the next st* repeat 6 times (18)
R5 : *2sc, sc2 in the next st* repeat 6 times (24)
R6 : back loops only *3sc, sc2 in the next st* repeat 6 times (30)
R7 : both loops *4sc, sc2 in the next st* repeat 6 times (36)
R8 : *5sc, sc2 in the next st* repeat 6 times (42)
R9 : *6sc, sc2 in the next st* repeat 6 times (48)
R10 : *7sc, sc2 in the next st* repeat 6 times (54)
R11 : *8sc, sc 2 ini the next st* repeat 6 times (60)
with white yarn
R12 : *6 hdc in next st, join it with slst in next st* repeat until finish
with white yarn make ch 40, then, sew it around Celly's hat, then tie it together


Celly's hat yellow flower :
with yellow yarn :
with magic ring, 1 sc in the hole, make 5 ch, 1sc in the hole, repeat until you get 5-6 petal.


Celly's skirt :
Celly's blouse is a half basic pattern, then continued with different color
*8 dc in next 2 st from hook, join it with slst in next 2 st* repeat until finish.


I sew some little beads for button at Celly's and Leo's shirt.


Complete Version


Btw, I made a ball and some strawberries in the basket to accompany the Leo's family. I will share you in my next post :-)


Ouchhh!!!

Rabu, 25 Juli 2012

Jack n Adele Amigurumi Rabbit Couple


Happy Crafting!!


Today I want to share with you about my craft that I made 4 months ago. I made it for my boyfriend to celebrate White Day. Honestly, this is the first time to make amigurumi for me. In the beginning, I am not really sure that I can make it, and I think that my first version was ugly :-( . But, the pattern is so clear, and sooo cute too, that was make me to not give up to understand the pattern and try to find my mistakes. If you want to make it too, you can download the pattern by click the link below : 

http://blog.craftzine.com/archive/2011/04/craft_pattern_spring_bunny.html

Look at that picture above!!  That is Terrible!! I hate it!! :-D

I think I was wrong about the eye material and the nose!! I can't follow the making of nose instruction. So, I bought plastic dog's eye and plastic cat's nose from craft shop. I thought it will be easier. I change my yarn material too. I used thicker yarn than before. And... tada!!! It's really better!! :-D


I named him : Blue Jack 

Btw, in the link pattern above, the hat and shawl are not included. I will share with you about the pattern. 

Blue Jack's hat :
R1     : ch 2
R2     : sc 6 in the second st from hook (6)
R3     : 2 sc in each st (12)
R4     : *2 sc, sc 1* repeat 6 times (18)
R5     : *2 sc, sc 2* repeat 6 times (24)
R6     : *2sc, sc 2* back loops only, repeat 6 times (24)
R7-11 : *2sc, sc 2* both loops, repeat 6 times (24)
R12   : *2sc, sc3* front loops only, repeat 6 times (30)
R13   : *2sc, sc4* both loops, repeat 6 times (36)
R14   : *2sc, sc5* repeat 6 times (42)
Roll the bottom up

Blue Jack's shawl :
R1 : ch 25
R2 : sc 1 in each, start from second st from hook (24)
tie it around Jack's neck

I made girl version too with pink yard. Luckily, I am still saving the making process photo :-)

start to sewing!!

Pink Adele is ready to go shopping.. :-D

Btw, Adele's shawl pattern is same with Jack with longer version (40 ch). I sew three pearl in the middle of blue rose at Adele's head.

Together... :-X

I wish Blue Jack and Pink Adele live happily ever after :-)


Selasa, 24 Juli 2012

Dweney Tiny Dog


Today is Dwi's 8 th birthday, wish you all the best, Dwi!! Dwi is my friend's daughter. She is a nice young girl. I like her.. :-)

Btw, a couple months ago, I got a little dog amigurumi pattern from a website. I think it was a great great idea to give her amigurumi dog key-chain. It will be useful for her!! Btw, if you want to make it yourself, you can download the pattern by click this link below :


http://reliquaryarts.blogspot.com/2008/09/say-hello-to-my-little-friend.html


The pattern is not too difficult. You can try it, may be in different color and material. I will share my version here. He is so cute, isn't he? I named him Dweney... similar... with Dwi? Hahaha... I think you can guess... :-D :-D


Dweney's Head..   He is cute already :-)

every part is done!!

I am already playing with you!!

Huk!! Huk!!  

Ohh... I am trapped!! Please... Dwi... help me!! :-D

I wish I will enjoy Dwi's birthday cake tomorrow.. haha :-D